|
Adding a Watermark will add a graphic or text in the diagonal position of each mini-page. You can select a separate font, color and size for each type. We have also provided 4 buttons that will insert the print job name, date, time and page number into the watermark.
| • | Job – <job> inserts the name of the first job listed in the Print Job bar |
| • | Date – <date> inserts the current date the job was printed using this format "month dd, yyyy" |
| • | Time – <time> inserts the current time the job was printed using this format "hh:mm AM/PM" |
| • | Page – <#> inserts the current mini-page number |
The fonts are scaled to match the mini-page they are used on; for example a 36 point font would be scaled down by a factor of 4 when used on a mini-page that is 4 times smaller than a regular sheet of paper. This makes it easy to set up a header, footer, or watermark that can be used for different booklet types as the text will be automatically sized for each booklet.
Note: Watermark graphics must be in bitmap (.bmp) format. The graphic colors will not be changed in any way and will appear the same way it does in your graphic editor. You may want to lighten up the graphic before using it as a watermark so the text in front of it does not get washed out. You can do this with most graphic editors and word processors. ClickBook uses a point for point system for sizing the graphic and will allow you to scale the watermark from 10 times its original size to 1/10 its original size. For example, a 600 by 600 pixel graphic would be 1 inch on a mini-page using a 600 dpi (dots per inch) printer. To make the graphic 2 ½ inches or 2 ½ times bigger enter 2.5 in the edit box below the Graphic button.
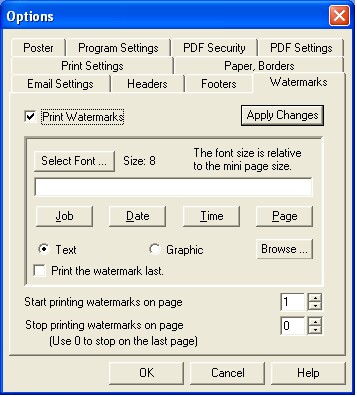
To place a Watermark on your current print job follow these steps:
| 1. | Click on the Options button  on the toolbar. This will bring up the Options dialog box. on the toolbar. This will bring up the Options dialog box. |
| 2. | Select the Headers, Footers, and Watermarks tab. |
| 3. | In order to print a header a check must be placed next to the Print Headers, Footers, & Watermarks field. Note: Header, Footers, and Watermarks can be permanently shut off by un-checking the "Print Headers, Footers, & Watermarks " checkbox. |
| 4. | From the drop down menu select Watermark. |
| 5. | Now select the desired radio button to include a Text or Graphic Watermark. |
| 6. | If Text has been chosen you may now decide what information is to be placed in the Watermark. Options include placing the following: |
| • | Job: places the title of the first print job listed in the Print Job window. |
| • | Date: Places today's date. |
| • | Time: Places the current time. |
| • | Page: Places the page Numbers. |
| • | Textbox: Type text as you want it to appear. |
| 7. | To change the look and feel of the Watermark click the Select Font button. The Font window will open and from here the Font, Font Style, Size, Effects, Color, and Script can all be changed. The sample window will demonstrate how the changes will appear. |
| 8. | If Graphic has been chosen you can browse to the location of the image and select it or type the location of the image in the text field. |
| 9. | The Scale watermark graphic times the original size field allows you to make the image larger or smaller as desired. |
| 10. | The Start printing Headers, Footers, and Watermarks on page option allows you to choose which page the Headers, Footers, and Watermarks will begin. Note: This feature allows you to start the process of printing Headers, Footers, and Watermarks on the mini-page of your choice. This is useful for when you have a cover page and you don't want the page number to be printed on that page. Please note that the page numbering will start on the page you choose. For example, if you start on page 3 it will be numbered as 1, page 4 will be 2 and so on. |
| 11. | The Stop printing Headers, Footers, and Watermarks on page option allows you to choose which page the Headers Footers, and Watermarks will end. Note: The default setting of 0 will end the printing of Headers, Footers, and Watermarks on the last page. |
| 12. | Click Apply Changes to view any modifications you have made to your headers, footers, or watermarks. The changes will appear in the print preview window. If the changes are acceptable click OK. A Watermark will now be placed on your print job. |
Note: Watermarks are not printed on posters.
|